Five easy steps from restore script to compliance proof
RestoreTest automatically validates your backups and stores audit‑ready evidence for NIS2 and other compliance requirements, across databases, file servers and critical business systems. This page walks through the four main steps to get from idea to running, automated restore tests.
Step 1 – Decide where to run RestoreTest
Start by choosing where RestoreTest should execute in your environment. Here are some examples:
- Run RestoreTest on a dedicated VM in your data center.
- Run RestoreTest in Azure Container Instances (ACI)
- In your Docker environment.
- Run RestoreTest on a Synology NAS completely away from your normal IT operations.
The only hard requirement is that RestoreTest can reach your backup storage, your test/restore environment, and any systems you want to probe.
Pick the option that best matches your security model and where your existing backup jobs and test environments are located.
Step 2 – Script how to restore your data
Next, define how to pull data out of your backup platform and restore it into a safe test environment.
- Use your backup solution’s CLI, API or scripting tools to export or mount a restore point.
- For example, you might download and restore a SQL backup into a secondary SQL instance, separate from production.
- The same pattern works for file servers, ActiveDirectory, ERP databases, on top of Veeam and other workloads, as long as they can be restored through automation.
RestoreTest plugs into this restore script, so every run follows the same, repeatable restore procedure.
Step 3 – Define acceptance criteria for each restoretest
RestoreTest does not stop at “job succeeded” – it uses probes to verify that restored data actually makes sense for your business.
- Decide what must be true in the restored system for it to count as proof:
- Example: Read from a ledger table in the ERP system and check that there are transactions not older than 24 hours on workdays (Monday to Friday).
- Example: Verify that specific files, folders or database rows exist and match expected patterns.
- Configure different probes per system, so each database, file share or application has its own definition of “restore success”.
- Take into account company calendar rules (e.g. no new data expected on weekends or holidays) to avoid false alarms.
These probes become your automated, documented acceptance criteria for each restore.
Step 4 – Define evidence
For each restore test, decide exactly which data you want to store as evidence for future audits and compliance reviews. The goal is to have a repeatable, machine-readable record that proves what was restored and when.
- Identify the key business objects that show your restore is successful, for example latest rows in a ledger table with date, amount and description.
- Decide which fields to persist as evidence (such as timestamps, record counts, balances, and sample transactions).
- Configure your probes to write this data into structured evidence records every time RestoreTest runs, so you can present a consistent history to auditors.
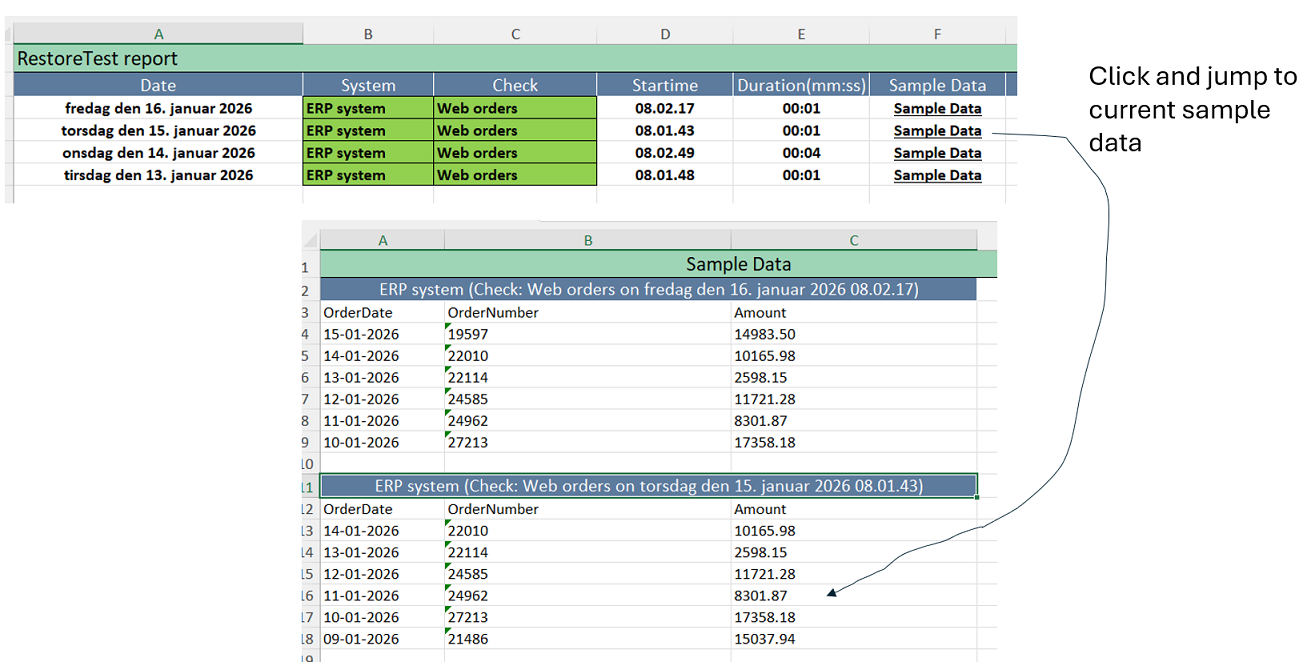
- The stored evidence can be exported as Excel and attached directly as documentation in your audit process, so auditors can review concrete records instead of screenshots or ‘ask-the-IT-guy’.
Over time, this evidence becomes a searchable audit trail that shows not just that backups exist, but that restores produce valid business data.
Step 5 – Schedule and run RestoreTest
With restore scripts and probes in place, you can turn RestoreTest into a recurring, tireless control.
- Schedule RestoreTest to run every hour, every night or on any cadence that matches your RPO/RTO and compliance needs.
- Each run:
- Restores data into the chosen test environment.
- Executes the configured probes.
- Stores structured evidence for every probe run, ready for audits and internal reviews.
- Over time you build a history of restore tests across your critical systems, which can be presented directly to auditors, customers or management.
When you are ready, reach out via phone or email to plan your first concrete setup based on your backup platform, ERP and infrastructure.
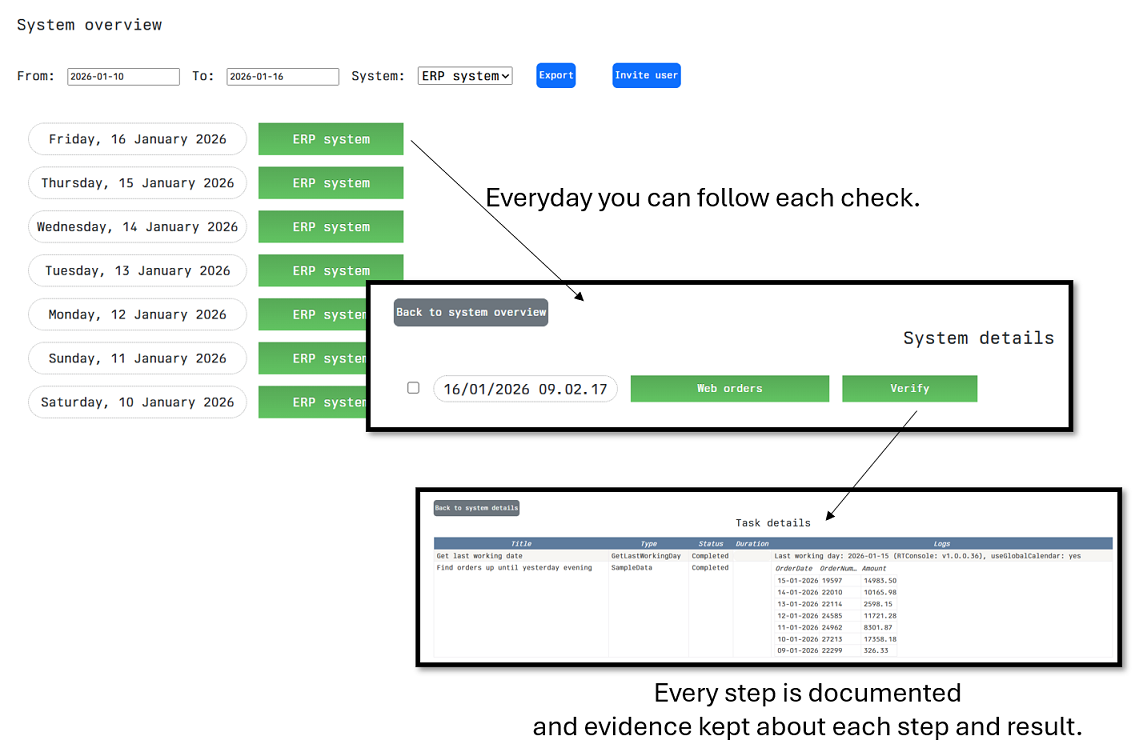
Follow progress every day in RestoreTest portal
Once RestoreTest is configured and your first tests have been created, you are ready to start using it in your daily work and watch your first output reports. Each execution is broken down into checks and steps, so you immediately can see what was run, when it was run, and whether it completed successfully or failed. From this screen you can monitor the status of your restore jobs, follow trends over time, and open detailed reports for each run to document results or troubleshoot issues.
Invite user
Next step could be to invite your compliance or auditor responsible to the RestoreTest portal, so they can verify compliance with their own eyes.
Export to excel
You can also export each system including all evidence data to excel file and email it to your compliance or auditor responsible.